Is your website slow to load? One quick fix is optimizing images on your site.
Depending on what type of image you have will determine how you should optimize it. Below are some helpful tips to get you started.
Choosing the Right File Type
How do you know which file type to use for your website? It really all depends on the type of image you are using, does it need a transparent background or not, is it a photograph or a vector graphic and where how this image is going to be used? All of these questions factor into which file type you should use.
JPEG (Joint Photographic Experts Group)
A .jpeg (or .jpg for short) is a lossy compressed file. Lossy compression removes all of the unnecessary data in the original file to make it smaller when compressed. Once compressed you can not recover this data. This format has a color palette in the millions, supports RGB (for web) color spaces as well as CMYK (for print).
Use for:
- Still images
- Photographs that do not include text, lines, or graphics
- Print & web
PNG (Portable Network Graphics)
A .png is a lossless compressed file and was specifically created for web. Lossless compression makes the file smaller while maintaining a full range of color and much better compression. You can also recover the data in a lossless compressed file if you ever decide to uncompress it. The downside is that a .png is usually a bit larger than a .jpg when talking file size.
A .png also has the ability to save a graphic with a transparent background. This format supports RGB (for web) color spaces. PNG format does not support CMYK (for print) color spaces.
There are two types of png: PNG-8 and PNG-24. PNG-8 has a maximum of 256 colors, whereas PNG-24 has an unlimited amount of colors. Use PNG-8 for graphics such as icons, logos, etc.
Use for:
- Icons
- Graphics with transparency
- Photographs that includes text, lines, or graphics
- Web
GIF (Graphic Interchange Format)
A .gif is a lossless compressed file limited to 256 colors and is used most commonly for web animations. A .gif can also be a static image, however, most static images have a complex range of tones therefore losing quality when saved as a gif. Stick with .gif for animations and you’ll be in the safe zone.
SVG (Scalable Vector Graphic)
A vector graphic (SVG) is a lossless digital image that uses mathematics to define the lines, curves, paths, and shapes making up the graphic on your screen. It is infinitely scalable, which means you can change the size of the graphic without ever losing quality.
You can also think of these graphics as coded artwork, which is why it works really well on the web. Unfortunately some WordPress themes won’t allow you to use them. SVG is still fairly new and the browsers haven’t quite caught up to them yet.
Use for:
- Logos
- Icons
- Print & Web
Now that we know which file type to use for what, let’s talk about optimizing those images and some programs to help you.
The goal to optimizing images is to reduce the file size while maintaining quality, period. We just need to figure out how to maintain the highest quality image/graphic at the lowest file size. That’s why there really isn’t a global setting you can just run an action on.
Image Resolution
Images saved for web should be set at a minimum resolution of 72 ppi (pixels per inch). Anything less than that and they will look pixelated. Images saved for print are generally set at 300 dpi (dots per inch). The higher the resolution, the larger the file size.
File sizes
A general rule of thumb for product photos, photos within the body copy of a web page or a blog should be around 60-70 kilobytes (KB). Our blog has a layout that is centered on the page rather than full-width, so I like to keep my images within my blog at a max-width of 700px.
For larger images like banners, featured images, etc. I generally set a max-width of 2048 px and a max-height of 2048 px set on my website with a maximum file size around 500KB. If any of your file sizes are in the megabyte (MB) or larger range, you need to size them down.
Exporting from Photoshop
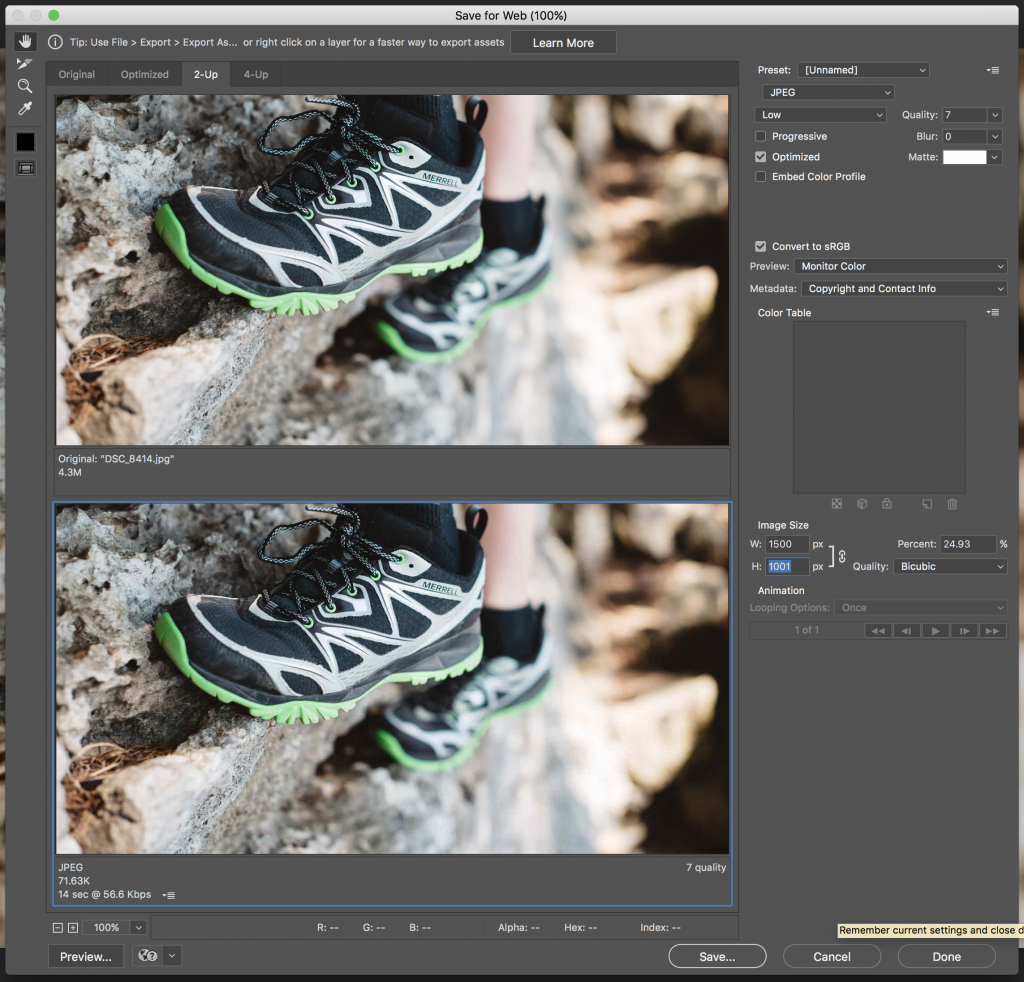
Adobe Photoshop has viewing options when saving for web to preview the outcome of quality before exporting. This gives you the flexibility that you need so you can make adjustments based on what you see before you export.
This original image file from our super talented photographer Sam Frawley, was 6016 x 4016 set at a resolution of 240 with a file size of 4.3MB. When saving for web within Photoshop, I reduced the dimensions to 1500 x 1001 with a quality of 7, reducing the file size to 71.63KB without losing visual quality in the image.

I generally do not go all the way down to a quality of 7, but when running this test with the 4 up option in PS export for web, it looked great, so I went with it. This is what you have to do, just play with the settings until you feel comfortable with the outcome.
Photoshop Online
Even if you don’t own photoshop, there’s a nice free online photo editor that Adobe provides to the public. At the top of the page go to Tools > Express photo editor. Here you can upload a .jpg (less than 16 MB) and make simple photo adjustments to it, including resizing, cropping, and some other nice photoshop tools are included.
Resizing Images with Preview on a Mac
Preview, a program that comes with every mac, has an option built in where you can resize your image AND change the resolution! With Preview open, go to Tools > adjust image size. Change your image size to the smallest pixel width/height for your site and the resolution to 72 ppi. Make sure to keep “Scale proportionally” checked so your image keeps the same proportions.
Also mac users, be aware of screenshots. Take note of your file sizes when saving screenshots on your mac. Screenshots are automatically saved as a png with a resolution of 144 ppi.
Image Search Engine Optimization (SEO)
You’re doing all the work optimizing your images, don’t forget to add SEO to your image files on your site. Rename your images BEFORE uploading them to your site. Whatever the image name is will be the URL for that image and the SEO title.
Most importantly, fill out the alt text (alternative text) on each image. Alt text should describe the actual image and how it is used on your site. The alt text is there to describe to the blind what the image is and why it’s there using alternative text. Not only is alt text important for the blind, this is how Google sorts images for search.
Computers can do a lot of things, but describing pictures is pretty difficult for them. Google depends on you to describe the image to help them understand what the image is. This is especially important if these photos that you are optimizing are product photos. Using alt text on product photos is one of the best ways to use SEO to bump your products up in Google search.
Other Tools for Optimization
WP Smush – A WordPress plugin that you can use to optimize your images even further that are already loaded onto your website. WP Smush scans all the images on your site and compresses it even further, removing all the unnecessary data within your files.
ImageOptim – A program you can install on your computer (Mac or PC). This is really fast and easy to use. Just drag your image files into the ImageOptim window and the program will automatically start compressing the files.


