

Our team sat down for a couple of drinks (what’s new), with our very own graphic designer, LB, to better understand the basics of Adobe InDesign. This way, when we make presentations for clients, we can all contribute and make adjustments to the documents.
It’s no secret that without years of practice, design can be daunting. When you’re not actively using InDesign and other design programs, putting together a piece can be quite confusing. Continue reading for a summarized version of what we learned about InDesign to help make this process a little easier.
Setting Up Your Project
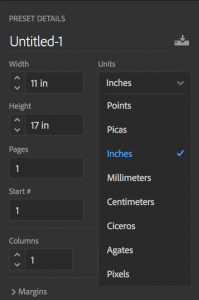 Firstly, it’s important to get the dimensions and settings right for your project. This tab is where you will indicate the name of, size, and type of document you will be creating. If you’re preparing a piece that will need to be printed, bleed and margins are necessary to help the printer determine where to trim the pages
What is “bleed,” you ask? The bleed is the extra area past the document size that gives space to account for printing inconsistencies. You will always want any images, graphics, or backgrounds in your piece to extend out to or beyond the bleed. Additionally, the area located outside of the normal printing boundaries that contains information about the printing job is called the slug.
In this document setup tab, you can also create a specific number of text columns on each page, set up how many pages you will need in your document, and choose whether or not you want the pages to be facing (like a book) or all separate.
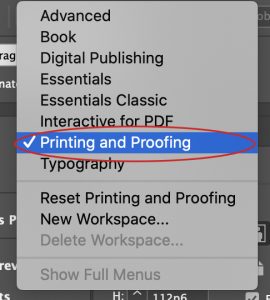
Once you get into your document, you will want to choose the correct menu for your needs. This will allow you sort of a “preset” of tools that are already visible for your convenience. In this case, we will choose the “Printing and Proofing” menu.
The Toolbar
The toolbar will become your best friend throughout the entire design process. Essentially, the toolbar consists of all your basic tool needs.
Tip: Hovering over each icon will give you the names and shortcuts!
Below is a list of a few essential tools and tips you’ll need to know while navigating the InDesign toolbar. We stuck to learning these few based on what we would need to know editing or adding to a presentation or document.
![]()
- Selection tool– Main arrow tool for clicking on and moving objects around the page.
- Type tool– Add text to and edit text in your document with this tool. While using this tool, you can change the font, size, kerning, leading, orientation, baseline shift, and alignment all within the Character and Paragraph panels. If you don’t see those, just head up to the Window tab on the main navigation and open whichever specific panel you need.
- Frame tool – Create shapes that you can insert photos into. You can create rectangles, ellipses, and polygons with this tool.
- Shape tool – Add backgrounds and shapes to your piece.
- Eyedropper tool – Pull certain colors for your piece from images and create color themes.
- Swap fill and stroke tool – This is where you can double click on both the fill and stroke of text, as well as objects to change the color. You can also click the small arrows above the fill and stroke, to reverse the fill and stroke colors.
A few descriptions of panels that you will want to open throughout editing your piece are below. You can find any of these panels under the main navigation “Window” tab.
- Paragraph – Assists in editing the alignment of text, as well as adding indents and bullets and numbering.
- Character – Allows you to change text font, size, kerning, leading, baseline shift, and more.
- Layers – Contains all the layers of your project. You can organize your layers in this panel by moving them up and down, adding new layers, and naming them accordingly. You can also lock layers and hide them within this panel.
- Swatches/Color – Panels where you can choose, add and create color swatches to use throughout your project.
- Effects – Add effects to text, shapes, and images such as a drop shadow.
- Stroke – Panel for changing the stroke weight and style.
Adding Images to Your Project
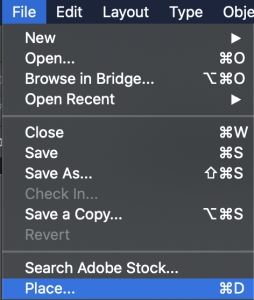 Adding images to your project is fairly simple. You can either drag your image into the project, or you can go to File > Place and choose your image from your computer.
Be careful when dragging and placing images into your projects because if you drag them into a box or other shape, the image will place into that shape. To change the size of your image once it is in InDesign, use the percentage tabs at the top toolbar in InDesign. You can also hold Shift and decrease the image frame size, and then right-click on the frame, go down to Fitting and use the Frame Fitting options to meet the needs of your image.

Exporting Your Project
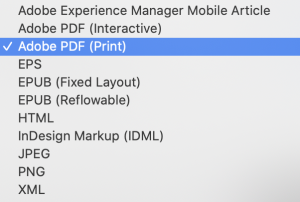
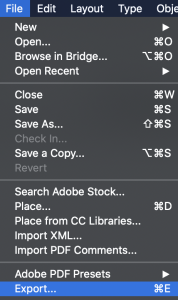 When it is time to export your project, you will first need to consider what you will be using this for. Will it be a PDF used as a digital presentation? Will it be used as a print document? Let’s say you want to export it to be used as a digital presentation for a client. Go to File > Export and click the drop-down menu to choose “Adobe PDF (Interactive)” from the list. If it is for print, choose “Adobe PDF (Print).” You can also choose “JPEG” and other file types here. Choose your export destination and a more detailed menu will come up where you can specify a long list of other settings for your PDF. If for print, you will need to check all of your images’ colors and swatches colors to make sure they are set up in CMYK color mode. Once you have checked all of the settings for your file, click “Export” and you will find your PDF in the location you specified.
These are the very basics of using InDesign. What happens when you come across a question not covered in this blog? Adobe has endless forums and tutorials online for your convenience! If you can’t find the answer there, YouTube is an incredible resource for learning the ins and outs of InDesign and other design software.
Despite this being Laura Beth’s area of expertise, our team at Parachute Media is always willing to help. To learn more about other Adobe products, we recommend checking out our Tips for After Effects blog.
Does your brand need a design transformation? We can help. Give us a shout via email or phone and our creative experts will be at your service!